Build a secure, powerful, and reliable router using OpenBSD.

You can create a secure and capable router by installing and configuring OpenBSD on some hardware that's suitable for the purpose. This guide explains how you can create an industrial-strength router+firewall appliance.
OpenBSD is a superb operating system to choose for network routing and filtering. The OpenBSD project emphasizes standardization, correctness, and proactive security. OpenBSD's Packet Filter (PF) is powerful software that you can configure according to your preferences using a human-readable syntax.
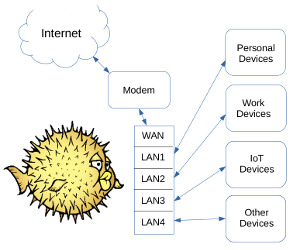
The instructions in this guide will create a router where two separated local networks (LANs) share a single Internet connection. The example device has three physical ethernet ports, however you can easily adapt the configuration to accomodate hardware with a different number of ports.
Nearly every home or office should have at least two isolated LANs for security reasons. For example you can separate personal devices away from work devices or mitigate the risks of inherently-untrustworthy IoT devices by putting them on their own separate network.
Choose Suitable Hardware
Baseline "horsepower" requirements are minimal if all you want to do is basic routing. Your main criteria should be stability and longevity of the device. Network adapters with an Intel chipset are recommended.
Storage requirements are minimal as well. The basic OS installation is small -- well under a gigabyte, even if you install some extra packages. You can use any size hard drive or SSD, or even a flash drive. It would be wise to run your disk through a torture test, especially if it's a used disk.
Fanless Mini PC

Two common open-source router hardware choices are the "Fanless Mini PC" and the retired enterprise desktop computer with a server-grade network adapter installed.
Chinese manufacturers make small and silent Fanless Mini PC devices that consume very little power. They 're popular among the pfSense crowd. You can find a suitable model with four Intel-chipset gigabit network ports and a Celeron J1900 CPU for under $150. If you need AES cryptographic acceleration (e.g. for VPN purposes) expect to spend about $250 for a more powerful model with a Celeron 3865U CPU or some similar processor with integrated AES instructions.
Off-Lease Corporate Desktop or Workstation

You can build a superb router using an off-lease corporate desktop or workstation computer and a multi-port server network adapter from a retired corporate server. Enterprise gear is suitable because it's built to higher specifications than consumer gear. It will run 24/7 for years on end.
You can find a suitable retired corporate desktop machine on eBay or elsewhere for well under $100. The router in this guide was made from a Dell OptiPlex GX620, a machine that's plenty fast and old enough not to have any "active management" features. Similar machines are available from HP and Lenovo. Your machine needs to have at least one standard PCI Express expansion slot.

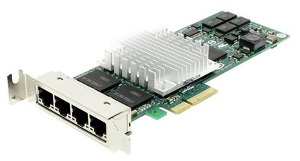
For network ports, use a multi-port server adapter that has an Intel chipset. You can find cards that are re-branded Intel Pro/1000 PT adapters sold by HP, Dell, Sun, IBM, and others. They're available for about $8 per port. Be sure your card has the correct bracket, either standard-height or low-profile.
Install OpenBSD
Install just the bare minimum OS because that's all a router needs.
If your machine has an optical disk drive, burn a CD and install from that. Otherwise make a bootable thumb drive and use that for the installation.
You may be surprised how easy OpenBSD is to install. Just choose (I)nstall and answer some questions. The example log's responses are from an installation that was onto a hard drive from a CD.
Example OpenBSD installation log:
System hostname = prism
Which network interface do you wish to configure = em0
IPv4 address for em0 = dhcp
IPv6 address for em0 = none
Which network interface do you wish to configure = em1
Symbolic (host) name for em1 = prism
IPv4 address for em1 = 192.168.21.1
Netmask for em1 = 255.255.255.0
IPv6 address for em1 = none
Which network interface do you wish to configure = em2
Symbolic (host) name for em2 = prism
IPv4 address for em2 = 192.168.22.1
Netmask for em2 = 255.255.255.0
IPv6 address for em2 = none
Which network interface do you wish to configure = done
DNS domain name = headquarters.lan
DNS nameservers = 9.9.9.9 (or whatever you prefer)
Start sshd(8) by default = yes
Do you want the X Window System to be started by xenodm(1) = no
Change the default console to com0 = no
Setup a user = user (or whatever you prefer)
Full name for user user = User
Allow root ssh login = no
What timezone are you in = UTC
Which disk is the root disk = wd0 (yours might be different)
Use (W)hole disk or (E)dit the MBR = w
Use (A)uto layout, (E)dit auto layout, or create (C)ustom layout = a
Which disk do you wish to initialize = done
Location of sets = cd0
Pathname to the sets = 6.4/i386
Set name(s) = -x*
Set name(s) = -g*
Set name(s) = -c*
Set name(s) = done
Directory does not contain SHA256.sig. Continue without verification = yes
Location of sets = done
OpenBSD Configuration Tweaks
Start out with some initial steps that you'd take with virtually any server.
Log in using your username (not root) and check your mail. Hit Enter or Space to proceed and q when you're done.
$ mail
Next use root's password for the one and only time.
$ su -
Run syspatch to apply base system binary patches.
# syspatch
Update installed packages.
# pkg_add -u
Optionally add a simple text editor. (This guide uses vi.)
# pkg_add -v nano
The doas utility in OpenBSD is similar to sudo on other systems. It allows you to execute privileged commands without logging in as root or using root's password.
Create a doas configuration file.
# vi /etc/doas.conf
/etc/doas.conf
# /etc/doas.conf -- doas(1) utility configuration file
#
# Allow wheel by default
permit persist keepenv :wheel
Set permissions on the new configuration file.
# chmod 660 /etc/doas.conf
We no longer need to be logged in as root or use root's password.
Restart the computer to ensure all of the patches are squared away.
# reboot
Next create an appropriate welcome screen.
Make a backup.
$ doas mv /etc/motd /etc/motd.orig
Create the file.
$ doas vi /etc/motd
/etc/motd
Unauthorized use of this system is prohibited.
Set permissions.
$ doas chmod 640 /etc/motd
Match the group ownership of the original file.
$ doas chgrp operator /etc/motd
Optional: Switch the time zone to UTC:
$ doas ln -fs /usr/share/zoneinfo/UTC /etc/localtime
Recommended: Move SSH to a different port. You should probably choose a port that's not one of the 1,000 ports that are scanned with nmap by default. (See the nmap-services file on a machine that has nmap installed.)
$ doas vi /etc/ssh/sshd_config
- Change the Port from 22 to your alternative port number (e.g. 4222).
- Uncomment the line.
The line that was #Port 22 becomes Port 4222 .
Restart the daemon.
$ doas rcctl restart sshd
A router doesn't need a sound daemon, so turn it off and set it not to run at startup.
 $ doas rcctl stop sndiod
 $ doas rcctl disable sndiod
Configure Network Interfaces
Skip ahead to the Firewall Configuration section if you configured the network interfaces during setup.
The example machine is a "multi-homed host" with three Intel-chipset physical network ports. One port (em0 in this example) will become the gateway and each of the other two (em1 and em2 in the example) will have its own isolated private network.
Gateway Interface
Some lucky folks will just need to use DHCP for their WAN interface.
/etc/hostname.em0
dhcp
If your external interface uses a static IP address, set the address, netmask, and gateway.
/etc/hostname.em0
inet 10.10.10.101 255.255.0.0
/etc/mygate
10.10.10.1
Private Network Interfaces
Each LAN interface will have it's own RFC1918 private network address block.
/etc/hostname.em1
inet 192.168.21.1 255.255.255.0
/etc/hostname.em2
inet 192.168.22.1 255.255.255.0
Firewall Configuration Tweaks
Our router+firewall will perform three basic functions: Routing and filtering (handled by pf), address assignment (handled by dhcpd), and domain name resolution (handled by unbound).
Note: This would be a good time to log into your new machine using SSH (on the customized port, if you have one). That way you can use copy-and-paste rather than typing.
Configure PF
Back up the original configuration file.
$ doas mv /etc/pf.conf /etc/pf.conf.orig
Create a put our ruleset in a new configuration file.
$ doas vi /etc/pf.conf
/etc/pf.conf
# /etc/pf.conf -- Packet Filter configuration file
# Two private LANs share a WAN connection.
#

# Macros
lan1_if = "em1"     # LAN 1
lan2_if = "em2"     # LAN 2
ssh_port ="4222" # Alternative SSH port

# Tables
table <martians> { 0.0.0.0/8 10.0.0.0/8 100.64.0.0/10 127.0.0.0/8 \
                   169.254.0.0/16 172.16.0.0/12 192.0.0.0/24      \
                   192.0.2.0/24 192.168.0.0/16 198.18.0.0/15      \
                   198.51.100.0/24 203.0.113.0/24 224.0.0.0/4     \
                   240.0.0.0/4 !255.255.255.255/32 !192.168.24.0/24 }
                   # 192.168.24.x is whitelisted for testing purposes
table <abusive_hosts> persist

# Options
set block-policy drop    # Drop rather than return a reset
set skip on lo0          # Disable filtering on loopback
set loginterface egress  # Log is at /var/log/pflog

# Normalize and de-fragment
match in all scrub (no-df random-id max-mss 1440)
# Translation (NAT) for LAN
match out on egress inet from !(egress:network) to any nat-to (egress:0)

# Spoofers, Martians, and abusive hosts
block in quick from urpf-failed
antispoof quick for { egress $lan1_if $lan2_if }
block in quick on egress from <martians> to any
block return out quick on egress from any to <martians>
block in quick from <abusive_hosts>

block all                             # Block unless another rule matches
pass out quick inet                   # Allow all ipv4 out
pass in on { $lan1_if $lan2_if } inet # Allow incoming ipv4 from LAN

# LAN-to-LAN rules
pass in quick from $lan1_if:network to $lan1_if:network
block return in quick from $lan1_if:network to <martians>
pass in quick from $lan2_if:network to $lan2_if:network
#pass in quick from $lan2_if:network to 192.168.21.33 # A whitlisted host
block return in quick from $lan2_if:network to <martians>

# Allow ping and path MTU discovery on the WAN interface
pass inet proto icmp all icmp-type { echoreq unreach }

# Allow SSH on the WAN interface and limit abuse of the open port
pass in on egress inet proto tcp from any to egress port $ssh_port
pass in quick proto tcp from any to (egress)   \
     port $ssh_port flags S/SA modulate state  \
     (max-src-conn 15, max-src-conn-rate 15/5, \
       overload <abusive_hosts> flush global)
Consider whether you really need to SSH into your firewall from the WAN side (probably not). If not, either delete the lines that pertain to SSH or comment-out the rules by inserting a # at the beginning of those five lines.
Set permissions on the new configuration file.
$ doas chmod 640 /etc/pf.conf
Apply the new ruleset.
$ doas pfctl -f /etc/pf.conf
Enable Packet Forwarding
Now that our custom firewall rules are in place we can enable packet forwarding.
Create the configuration file that will start packet forwarding at startup.
$ doas vi /etc/sysctl.conf
/etc/sysctl.conf
# /etc/sysctl.conf -- sysctl configuration file
# This is a list of sysctl options the user wants set at boot time.
# See sysctl(3) and sysctl(8) for more information.
#
net.inet.ip.forwarding=1        # 1=Permit forwarding (routing) of IPv4 packets
Set permissions.
$ doas chmod 640 /etc/sysctl.conf
Now enable packet forwarding for this boot session.
$ doas sysctl net.inet.ip.forwarding=1
Configure the DHCP Daemon
Create the configuration file.
$ doas vi /etc/dhcpd.conf
/etc/dhcpd.conf
# /etc/dhcpd.conf -- DHCP server options
# See dhcpd.conf(5) and dhcpd(8) for more information.
#

subnet 192.168.21.0 netmask 255.255.255.0 {
        option routers 192.168.21.1;
        option domain-name "twenty-one.lan";
        option domain-name-servers 192.168.21.1;
        range 192.168.21.101 192.168.21.200;
}

subnet 192.168.22.0 netmask 255.255.255.0 {
        option routers 192.168.22.1;
        option domain-name "twent-two.lan";
        option domain-name-servers 192.168.22.1;
        range 192.168.22.101 192.168.22.200;
}
Set permissions.
$ doas chmod 640 /etc/dhcpd
Set dhcpd to run at startup.
$ doas rcctl enable dhcpd
Start the daemon.
$ doas rcctl start dhcpd
Configure DNS Services
Make a backup. (This is all one line.)
$ doas mv /var/unbound/etc/unbound.conf /var/unbound/etc/unbound.conf.orig
Create the configuration file.
$ doas vi /var/unbound/etc/unbound.conf
/var/unbound/etc/unbound.conf
# /var/unbound/etc/unbound.conf -- DNS resolver configuration
#

server:
        interface: 192.168.21.1
        interface: 192.168.22.1
        interface: 127.0.0.1

        do-ip6: no

        access-control: 0.0.0.0/0 refuse
        access-control: 127.0.0.0/8 allow
        access-control: 192.168.21.0/24 allow
        access-control: 192.168.22.0/24 allow

        do-not-query-localhost: no

        hide-identity: yes
        hide-version: yes

# Use an upstream forwarder (recursive resolver) for specific zones.
#

forward-zone:
        name: "."                     # use for ALL queries
        forward-addr: 9.9.9.9         # Quad9
        forward-addr: 149.112.112.112 # Quad9 secondary
#        forward-addr: 208.67.222.220  # OpenDNS
#        forward-addr: 208.67.222.222  # OpenDNS secondary
#        forward-addr: 8.8.8.8         # Google
#        forward-addr: 8.8.4.4         # Google secondary
#        forward-addr: 1.1.1.1         # Cloudflare
#        forward-addr: 1.0.0.1         # Cloudflare secondary

        forward-first: yes            # try direct if forwarder fails
Set permissions.
$ doas chmod 640 /var/unbound/etc/unbound.conf
Have the daemon run at startup.
$ doas rcctl enable unbound
Start the daemon.
$ doas rcctl start unbound
Congratulations, your router is configured and operational. :-)
Next Steps
You will probably want to make some changes to the configuration files, since they're just intended to be samples.
Here are some pf.conf file changes:
- Remove the exception from the <martians> list.
- If you don't need to SSH in from the Internet side, comment out the lines that are pertain to the SSH port.
After you edit the file, run doas pfctl -f /etc/pf.conf to replace the current ruleset your edited rules.
Notes and Resources
- "egress" is the interface with the default route
- Address Families: "inet" is ipv4 and "inet6" is ipv6
You can find plenty of information about OpenBSD and PF on the web.
Take a look at Firewalling with OpenBSD's PF packet filter by Peter Hansteen. The content is similar to what's in his book, The Book of PF.
If you need always-on Internet capability, build two identical routers so you can keep a spare router ready to deploy quickly in case of an emergency. See also: Firewall Redundancy
SystemRescueCd provides a perfect environment for "burning in" your router's storage device before you install OpenBSD.
Learn vi here: Vim 101: A Beginner's Guide to Vim
(The tutorial is for Vim; commands are mostly the same.)
See also: A puzzle game for practicing and memorizing VIM commands
If your system is pausing too long while "reordering libraries" at boot time, try this:
$ rcctl disable library_aslr
Universal Plug and Play (UPnP) is not supported by OpenBSD, no doubt because of (in)security reasons. Generally speaking UPnP should be rigorously avoided and disabled on any router where it's present. It may be possible to make UPnP work using MiniUPnP.
If you want to do DNS-based blocking of ads and trackers, consider using Pi-hole.
Wondering about wireless? It's a good idea to keep your wireless access point (WAP) and firewall separate. Many wireless routers -- especially ones with third-party firmware -- can be re-configured as a WAP rather than a router. A wireless router can be left as a router (rather than a WAP) and it will work fine for Internet access.
Your router has tcpdump installed by default. This is a powerful and useful feature all by itself.
Some commands to try:
 $ whoami
 $ doas whoami
 $ arp -a
 $ arp -an
 $ ifconfig
 $ netstat -f inet
 $ netstat -i
Remember to set your system so it powers back on automatically if electrical power is lost. On some machines it's wise to also enable a setting that ignores keyboard errors during startup.
If this router is "replacing" an ISP-provided router, set the original router to Bridge Mode if that's possible.
Here are some notes about the pf.conf file:
PF uses "macros" to ease administration. For example, something like "$lan1_if:network" is more meaningful than em1:network when you're looking at the configuration file.
Using an alternative SSH port is not universally recommended. Using an alternative port that doesn't appear in the list of 1,000 ports that nmap scans by default will reduce noise in security logs.
Tables, like macros, make administration easier by simplifying what is shown in the filtering rules.
The Martians table includes a whitelisted network (!192.168.24.0/24) you should probably remove, along with its comment.
These types of rules must appear in order:
Options -> Normalization -> Queueing -> Translation -> Packet Filtering
After the NAT rule are some rules that are pretty much universal in a firewall ruleset.
The LAN-to-LAN rules prohibit traffic among the LANs. You can add whitelist rules that, for example, allow devices on one LAN to reach a printer on another.
The rule that allows ping and path MTU discovery is recommended unless you have a specific reason not to allow those.
Results of nmap -O 192.168.nn.nn:
Starting Nmap 6.40 ( http://nmap.org ) at 2018-nn-nn nn:nn UCT
Nmap scan report for prism (192.168.nn.nn)
Host is up (0.00027s latency).
All 1000 scanned ports on prism (192.168.nn.nn) are filtered
MAC Address: 00:11:0A:AA:BE:EF (Hewlett-Packard Company)
Too many fingerprints match this host to give specific OS details
Network Distance: 1 hop

OS detection performed. Please report any incorrect results at http://nmap.org/submit/ .
Nmap done: 1 IP address (1 host up) scanned in 24.08 seconds
